3.3.3. Practice: Statements and Variables#
Choose Social Media Platform: Bluesky | Reddit | Discord | Mastodon | No Coding
This Python Notebook is a chance for you to try out the programming concepts we have covered thus far.
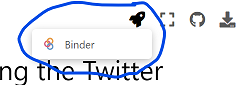
As we mentioned previously in the first bot demo (2.3.8), in order to run the code, you can look for the rocket button at the top which will give you an option to “launch binder”
If you launch binder, it will take a while to load, but eventually show you a version of this page Jupyter Notebook in a code editor called Jupyter Lab

In Jupyter Lab you can double click any section to edit it, and you can press the triangle “run” button to run the code (or display the text).
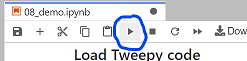
When the code runs, the little number to the left of the code block should change. There might also be some output from your action displyed below the code block.
So now you can go through the rest of this page and try out the practice exercises for yourself!
Variables#
You will first practice saving values into variables. Remember, the way we save a value into a variable is like this:
variable_name = value
First, save the piece of text “I am writing a computer program!” into a variable called my_progress
# TODO: enter your code here
Viewing variables in the debugger#
Before we continue, we are going to show you how to open the debugger so you can see what is being saved in your variables.
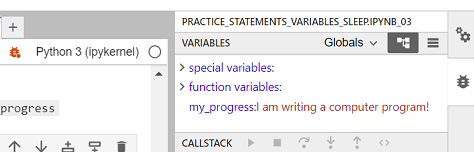
On the tp right of this tab, press the small bug icon to “enable debugging”:

Then, if you did the step above correctly, you should see the variable my_progress with the value “I am writing a computer program!” next to it:
Practice number variables#
First, write and run a line of code to save the value 5 into a variable named number_of_pies
# TODO: enter your code here
Now, save the value 12.5 into a variable named cost_per_pie
# TODO: enter your code here
Now make a new variable called total_pie_cost and save into the value of the number_of_pies multiplied by the cost_per_pie.
Note: In python (and many programming languages), the symbol for multiply is *
# TODO: enter your code here
Now use the display function to display what is saved in total_pie_cost
# TODO: enter your code here
More variable practice#
Now, make a new variable called first_name and assign your first name to it
# TODO: enter your code here
Now, make a variable calles last_name and save your last name to it
# TODO: enter your code here
Create a variable called age and assign your age to it.
# TODO: enter your code here
~ A year goes by ~
Increase the age variable by 1.
# TODO: enter your code here
Now write three lines of code, with each line using display to show what is saved in first_name, last_name, and `age
# TODO: enter your code here
Sleep#
In order to use sleep, we must first import it from the time library
from time import sleep
Now try displaying 5 messages of your choosing, with some pauses between each one:
# TODO: enter your code here
Bluesky Bot Practice#
Now lets try a Bluesky bot with variables and sleep!
Step 1: Load atproto (Bluesky) code#
First, we need to load the atproto library
# Load some code called "Client" from the "atproto" library that will help us work with Bluesky
from atproto import Client
(Optional) Step 1b: Make a fake Bluesky connection with the fake_atproto library#
For testing purposes, we”ve added this line of code, which loads a fake version of atproto, so it wont actually connect to Bluesky. If you want to try to actually connect to Bluesky, don’t run this line of code.
%run ../../fake_apis/fake_atproto.ipynb
Step 2: Login to Bluesky#
To use this on your real Bluesky account, copy your bluesky account name and login into the code below, replacing our fake bluesky name and password.
# Login to Bluesky
# TODO: put your account name and password below

client = Client(base_url="https://bsky.social")
client.login("your_account_name.bsky.social", "m#5@_fake_bsky_password_$%Ds")
Practice 1: Submit a post to Bluesky#
Post something you learned in the class so far:
Remember, the code to post to Bluesky looks like this:
client.send_post("This post was made by a computer program!")
# TODO: enter your code here
Practice 2: Post from a variable#
Now try saving a piece of text in a variable for the content of a post, and then try submitting a post of whatever you saved in the variable.
To do this, where the code has send_post( ... ), you’ll replace the quoted text with the variable name, so it will look like:
client.send_post(content_variable)
(with whatever your variable name was instead of “content_variable”)
# TODO: enter your code here
Practice 3: Submit multiple posts#
Next try submitting 3 posts, but use sleep to add pauses between each one (note that Bluesky might not want you to post too often so you can sleep for a few seconds or minutes between each time).
# TODO: enter your code here